
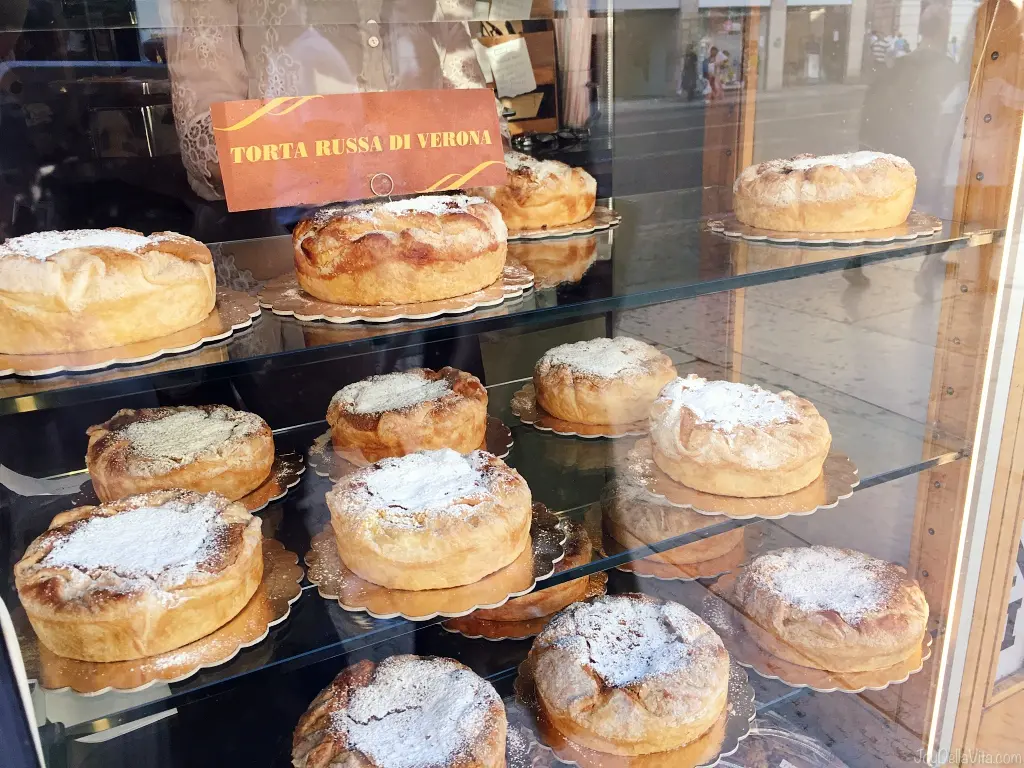
When in Verona, you have to try and taste the local speciality Torta Russa di Verona. Every city or region has its own recipes, and that’s something truly wonderful. Torta Russa di Verona means “Russian cake from Verona”, and the origin of this recipe isn’t actually that old. One of the two hypothesis of the origins of Torta Russa di Verona is that a Veronese pastry chef used to work on ships near Odessa, the “pearl of the Black Sea”, in the late 1960’s, and invented this sweet cake there. The other one is that the shape of the cake looks very similar to an Ushanka, colbacco in Italian, a typical Russian winter hat. The true origin is probably something of both. Undoubtedly accurate however is the popularity of this cake nowadays. Not only tourists enjoy Torta Russa di Verona, of course, the cake is also highly popular with locals. The preparation is actually not that hard, but of course, a slice of the cake tastes best in Verona, Italy by a local pasticceria. However, why not trying and baking this cake yourself?
Ingredients for 1 Torta di Russa
- 230 g puff pastry (1 store-bought package)
- 100 g soft butter (room temperature)
- 150 g granulated (brown) sugar
- 1 pinch salt
- 1 TS amaretto liqueur (or almond flavour)
- zest of 1 lemon
- 3 eggs
- 100 g almond flour
- 100 g crumbled amaretti cookies
- 150 g white flour 00
- 100 ml milk
- ½ sachet of baking powder (7 g)
- icing sugar / few almonds for decoration
Preparation for 1 Torta Russa di Verona, the “Russian cake from Verona”
If your butter isn’t already at room temperature, very soft to even slightly liquid, melt the butter quickly in a saucepan or in the microwave, and let it cool to room temperature. Meanwhile, whisk the 3 whole eggs together with the brown sugar, a pinch of salt and the zest of 1 organic lemon. As soon as it has become an even mixture, add the liqueur (it’s only for taste, not for the alcohol) and the butter and whisk everything for at least 3 to 4 minutes. You want a soft consistency of the dough. Now add the heavily crumbled amaretti / amarettini cookies (the crumbles should be almost as small as the granulated brown sugar), as well as the almond flour, milk and baking powder. Mix everything evenly.
Preheat your oven to 180 °C, cover a round baking dish (24-26 cm) with the pre-made puff pastry and pour the cake batter in. Fold the (outside) edges of the puff pastry inwards and bake it for 45 to 60 minutes (depending on the size of your cake). Let the cake cool down and before serving, cover the centre of the cake with a generous amount of icing sugar and place some whole almonds as decoration on top. Enjoy this Veronese speciality the same, or the next, day!
In Verona, you can enjoy a homemade Torta Russa di Verona at Pasticceria Barini, Corso Porta Nuova 8, near Torre pentagona not far Arena di Verona (It’s where I’ve taken these pictures).

Hungry for more? Browse all Italian recipes, other cake ideas and the Recipe category, or discover more from Verona in the Veneto category. Another sweet one is my orange and yogurt muffin recipe. Visiting Verona? Pair a slice of cake with the Teatro Romano and save with the Verona Card.
FAQ: Torta Russa di Verona
What is Torta Russa di Verona?
It is a traditional almond and amaretti cake from Verona, whose name means “Russian cake from Verona”.
Where does the name Torta Russa come from?
One theory says a Veronese pastry chef invented it in the late 1960s while working on ships near Odessa. The other says the shape looks like an Ushanka, the Russian winter hat. The true origin is probably a bit of both.
What ingredients do you need for Torta Russa?
Butter, eggs, brown sugar, lemon zest, liqueur, crumbled amaretti, almond flour, milk and baking powder. The full list with amounts is in the recipe above.
At what temperature do you bake Torta Russa di Verona?
Preheat your oven to 180 degrees Celsius, as described in the preparation steps of the recipe.
Where can you try Torta Russa in Verona?
Locals and tourists both love it, and it tastes best from a local pasticceria in Verona. You can also bake it yourself with this recipe.




Leave a Reply